IAM Integration overview
Introduction
When you integrate your existing Active Directory (AD) environment with BenQ Cloud Services, you take one huge step towards simplicity. You can save yourself from preforming many duplicate administrative tasks in yet another system requiring management. This integration allows users to connect to BenQ AMS, DMS, and X-Sign services, all while using the same familiar Active Directory credentials.
This configuration guide gives you an overview of the setup, configuration options, and overall operation of BenQ cloud services and Active Directory.
Table of Contents
- BenQ Services connect with AD server
- Whitelist Ports
- Geofiltering
- How to find the correct Base DN
- How to find the correct Bind DN
- Account attribute & email attribute
- Configure BenQ IAM with AD settings
- Change base DN to specific OU
- Select security Group DN
- Configure user permissions
- Import completion
- Next Steps
- FAQs
- LDAPS (LDAP over SSL port 636)
- Trusted 3rd Party LDAPS certificate
- Installing OpenSSL and creating a self-signed cert
BenQ services connect with AD server
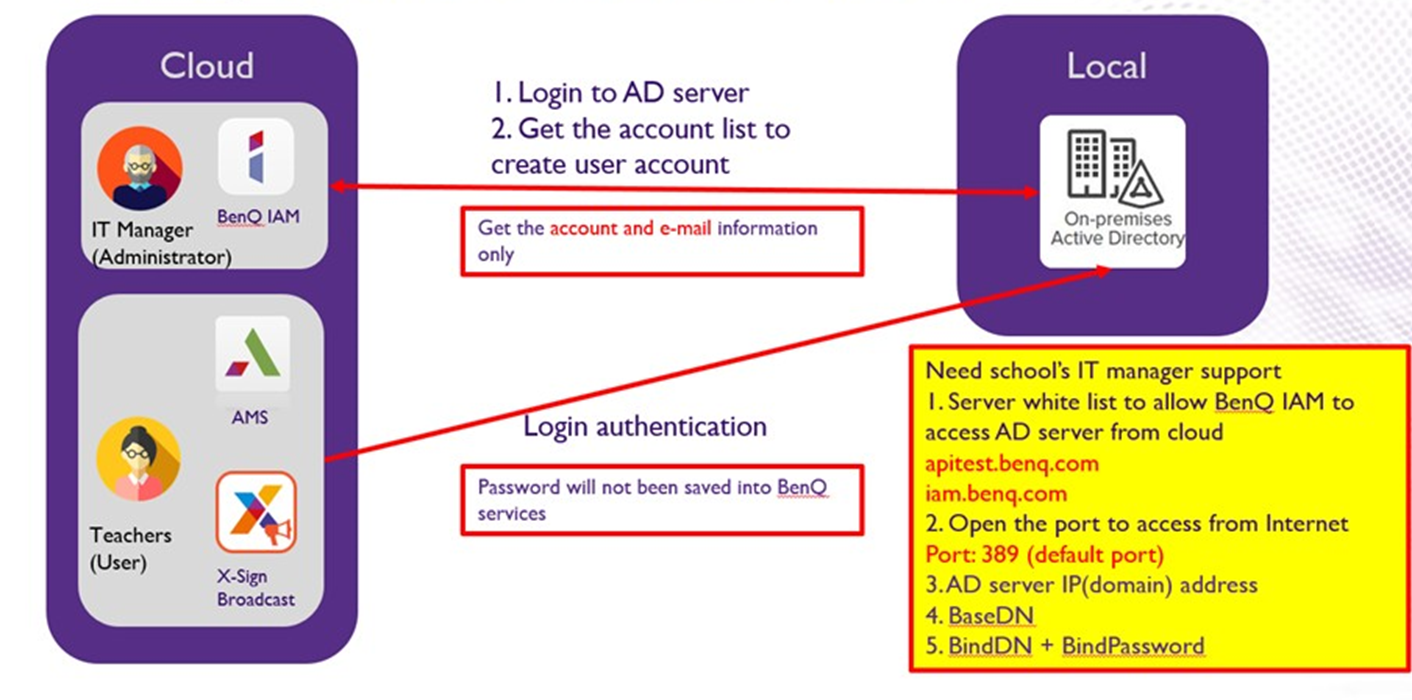
Whitelist Ports
- Server whitelist (allows BenQ IAM to connect to AD from the cloud)
- apitest.benq.com or 52.69.18.243
- iam.benq.com or 3.123.186.191
- Open these ports to access via the internet
- Ports 389 or 636 need to be opened on your firewall and NAT-ed to the Domain Controller that you are using for this. Please user an ACL to ONLY allow traffic from the FQDN addresses above, if your firewall does not support FQDN for ACLs please use the IP which is listed above – please note that this is subject to potential change at a later time.
- LDAPS (recommended) – port 636
- Traffic sent over port 636 is encrypted
- This does require a 3rd party or self-signed certificate on the domain controller to allow SSL communication, see the end of this document for more information.
- LDAP – port 389
- Traffic over port 389 is sent as clear text and is NOT encrypted
Geofiltering
- Check and see if geofiltering is turned on. This could cause our server to be
flagged.
- iam.benq.com or 3.123.186.191 (Japan)
- apitest.benq.com or 52.69.18.243 (United States)
Note
Remember to activate advanced features to see all setup options:
- From Active Directory Users & Computers Select View > Advanced Features
This will allow the attributes of AD items to be seen. 
How to find the correct Base DN
- The Base DN is the local domain name in Distinguished Name format. For example, the local domain name is zyxel.cso.com
→ Base DN (Distinguished Name): dc=zyxel,dc=cso,dc=com

How to find the correct Bind DN
- Go to <domain name> > Users > Right Click > Properties
- Click Attribute Editor > distinguishedName (DN)
- Bind DN: CN=Administrator, CN=Users,DC=zyxel, DC=cso, DC=com
- Bind Password: administer password
- Please note that this does not need to be a domain admin account. A simple domain user service account can be created specifically for use here.
- Also note that the attribute editor tab will not be visible when performing a search to locate the user.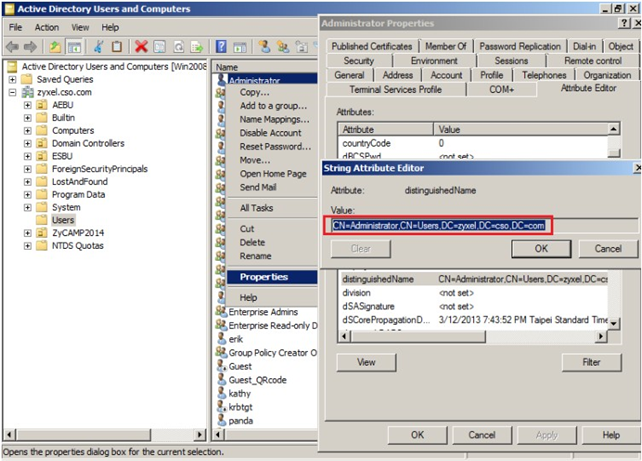
Account attribute & Email attribute
- Go to <domain name> > Users > Right Click > Properties
- Click Attribute Editor >
- AccountAttributes: The user login name, unique value
→ Ex: UserPrincipalName - EmailAttribute: It is the specified email address for the user in Active Directory.
→ Ex: mail
→ UserPrincipalName: TTRoung@dell.com
→ mail: ttruong@dell.com - If you attempt to import users and either the account attribute or the email attribute are when migrating from your local active directory, the import will fail. Typically domains that don’t have a valid email set on the general tab of the account (mail in attribute editor) will have this issue.
- The Defaults on the IAM website for account and email attributes sometimes have issues, so it is recommended to type UserPrincipalName manually into the box.
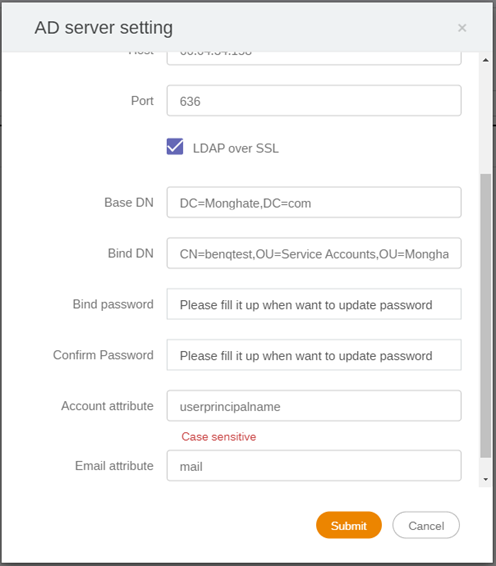
Configure BenQ IAM with AD settings
- Go to iam.benq.com and login with your admin account
- Click on AD Server Authentication
→ Check Enable AD server authentication
→ Fill out host, Base DN, Bind DN, and Bind Password
→ Click submit
Change Base DN to specific OU
- How can I only import certain users from my OU?
- This is very easy! All you have to do is configure your Base DN, using the settings below:
→ If you plan on looking for users from multiple OUs that use the same security group, then specify your ADs Root DN. You will select the security group in the next step
Example Setting Import
In the example shown - We are using the root DN of an active directory, as this allows us to see ALL accounts that exist on the domain.
- We plan on using a security group with this import which we will allow us to bring in select users from multiple OUs without cluttering our IAM portal with accounts we don’t need to give access to.
- This is very easy! All you have to do is configure your Base DN, using the settings below:
Select Security Group DN
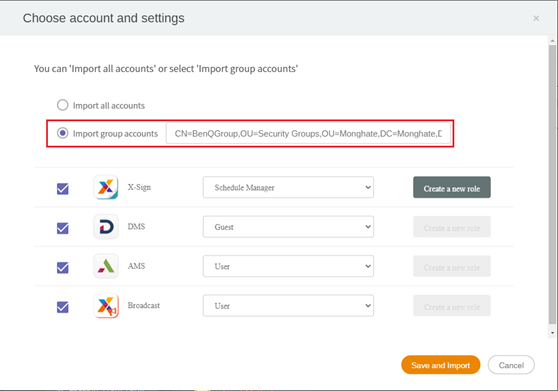
- Once you submit your settings for AD server import, it will prompt you to either import ALL accounts or import group accounts.
- All accounts will bring in every account in the OU specified in the previous screen that has a valid value for the account and email attributes.
- Group Accounts will bring in all users that are part of a specified security group, and group name will be in DN format like the other names we have specified so far.
Configure user permissions
- By default, all imported users have access to AMS, DMS, and X-Sign
To change all users to only have access to AMS:
→ From account management, click on the box in the top left to select all users
→ Click the edit pencil icon
→ From service setting, uncheck X-Sign, DMS, and Broadcast
→ Click the submit button
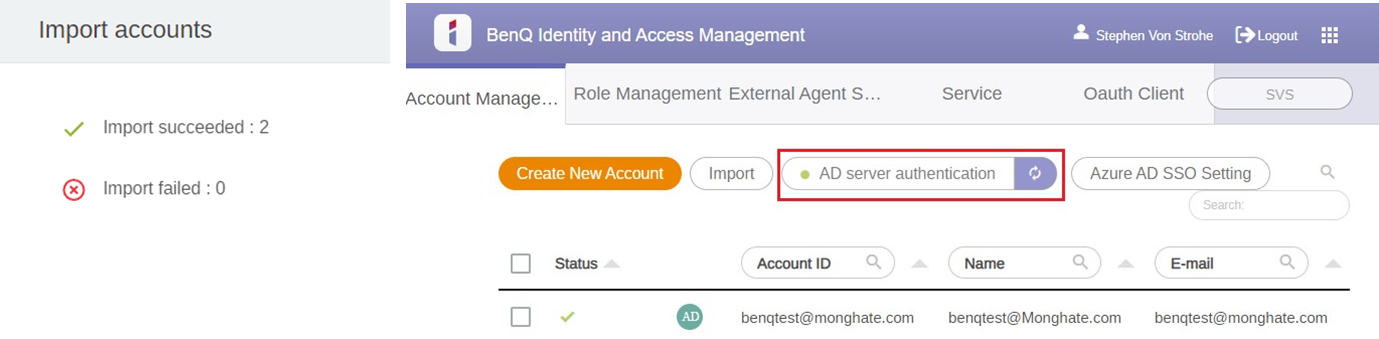
Import completion
- Our security group had 2 accounts in it, so out of the 8000 accounts available on the domain the security group selection only brought 2 into IAM.
- We can now see those accounts in the IAM portal and we can see the green dot next to our AD server authentication.
Next Steps
- Users can now log into AMS to attach cloud drives
- Passwords will authenticate against your AD.
- Note that passwords are not stored in the IAM service, as the AD server connection over ports 389/636 needs to be available for real time queries from the board that relay through IAM to our Domain Controller for password verification.
- For larger imports (4000+) we have seen some intermittent issues with accounts being generated in AMS, this is easily solvable by the BenQ team if you reach out for assistance.
FAQs
- Q: When new users are created in AD, can an IAM also be created?
→ A: No, IAM does not auto-synchronize the AD account list as of this writing, so IT needs to trigger AD server settings to refresh - Q: Can IAM accounts be removed by deleting the associated accounts in AD?
→ A: No, but if an account is deleted on the AD server, that user cannot log into the associated IAM account - Q: Can IAM permissions for AMS/DMS/X-Sign be managed by group from within AD?
→ A: Currently, we only support account and email sync, but we are reviewing the ability to grant AMS/DMS/X-Sign permissions via AD group membership. For now, these permissions must be set in iam.benq.com - Q: Are account passwords stored on the server?
→ A: IAM only gets the account list from the AD server, so all authentications are still performed on the local AD server. - Q: Is there a way to skip the normal email confirmation for these imported accounts to work?
→ A: No, this is a security issue, and email confirmation is a must - Q: If we cannot skip email confirmation, can we bulk send email confirmation for all unconfirmed IAM users?
→ A: No, but IT can see unverified accounts, and users can go to IAM to resend an email confirmation on their own
LDAPS (LDAP over SSL port 636)
Two common methods exist for connecting the IAM service to your local Domain Controller over LDAPS:- Importing a 3rd party certificate to the domain controller, this method requires purchasing a certificate from a root authority if you don’t already have one that lists the FQDN of the domain controller as a Subject Alternative Name and meets a few other requirements.
- Creating your own Self Signed certificate on the server. This requires installing the Certificate Authority Role on the server or using a program like OpenSSL This method does not cost anything.
Trusted 3rd Party LDAPS certificate
To enable LDAPS, you must install a certificate that meets the following requirements:
- The LDAPS certificate is located in the local computer's personal certificate store (programmatically known as the computer's MY certificate store).
- A private key that matches the certificate is present in the local computer's store and is correctly associated with the certificate. The private key must not have strong private key protection enabled.
- The Enhanced Key Usage extension includes the Server Authentication (1.3.6.1.5.5.7.3.1) object identifier (also known as OID).
- The Active Directory has a fully qualified domain name for the domain controller. For example, DC01.DOMAIN.COM must appear in one of the following places:
- The Common Name (CN) in the Subject field.
- DNS entry in the Subject Alternative Name extension.
- The certificate was issued by a CA that the domain controller and the LDAPS clients trust. Trust is established by configuring the clients and the server to trust the root CA to which the issuing CA chains.
- You must use the SCHANNEL cryptographic service provider (CSP) to generate the key.
Installing OpenSSL and creating a Self-Signed cert
- The easiest method to do this is to install OpenSSL on the server or another machine.
- The direct download for OpenSSL x64 can be found HERE
- First install OpenSSL and then open an Admin CMD prompt and change to that working directory.
- Typically the path is
- %programfiles%\OpenSSL-W in64\bin
- We will be working with this directory for the files we are creating as examples

- Generate the Certificate Authority:
- Type the following command:
- openssl genrsa -des3 -out ca.key
- It will ask you to pick a password and confirm it.

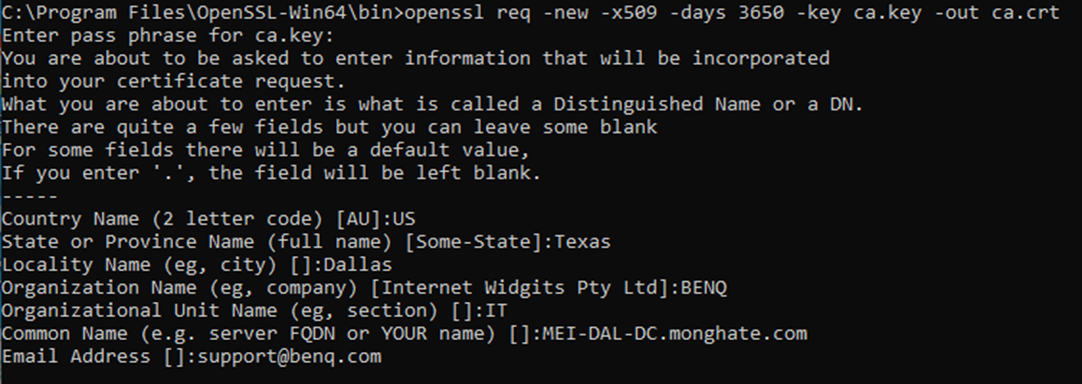
- Creating the CRT
- Type the following command:
- opensslreq -new -x509 -days 3650 -key ca.key -out ca.crt
- It will ask you to fill out some basic information
- The important item here is the Common Name – it needs to be your domain controllers FQDN
- Import the root CA and create the CSR
- Copy the ca.crt and ca.key files from the pc with OpenSSL installed over to your domain controller to the Documents folder or any location you prefer.

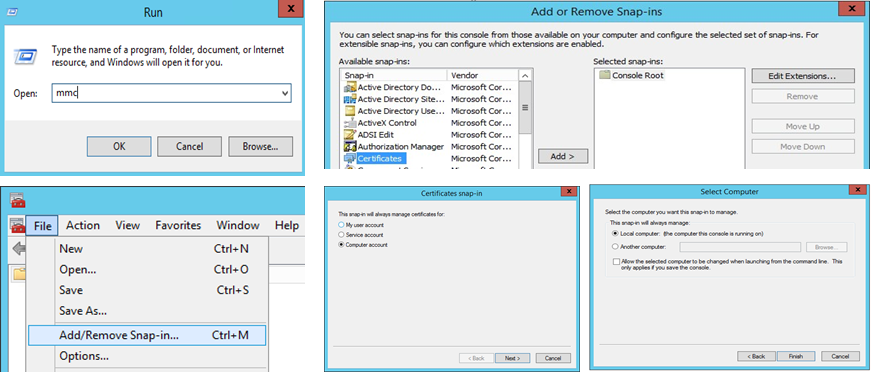
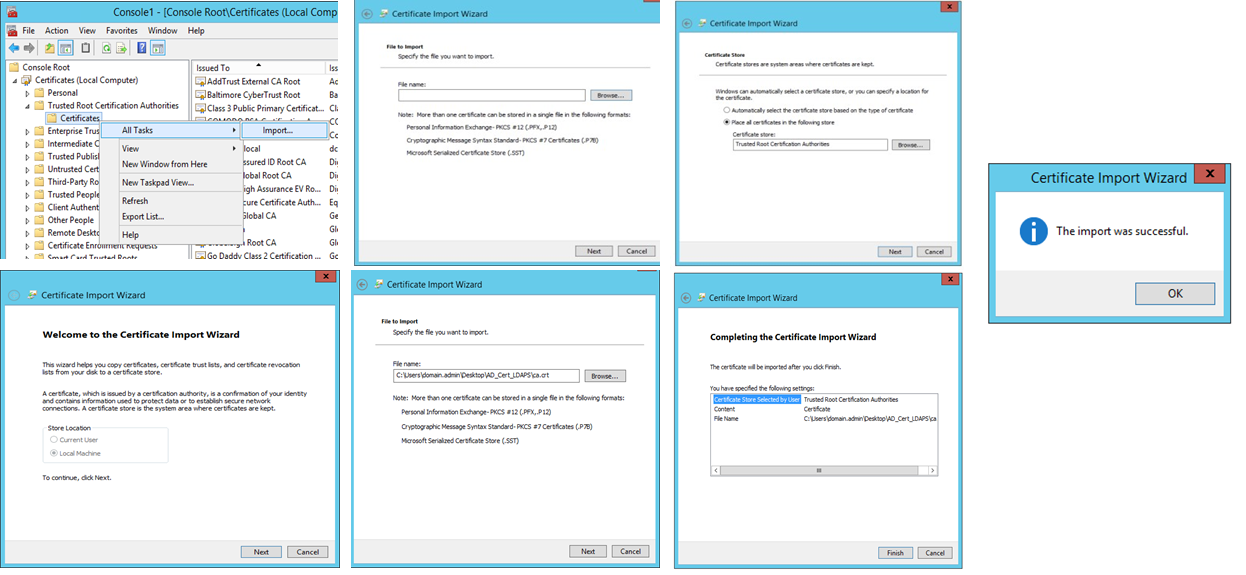
- Open Certificates MMC Snap-in
- Press Windows key + R
- Open MMC, File > Add/Remote Snap-in > Click Certificates > Add
- Click Computer account > Click Local Computer > Finish, Click OK
- Import ca.crt to the Trusted Root Certification Authorities
- Browse to the path where you saved ca.crt and import that file to the Trusted Root Certification Authorities
- Generate a Client Certificate
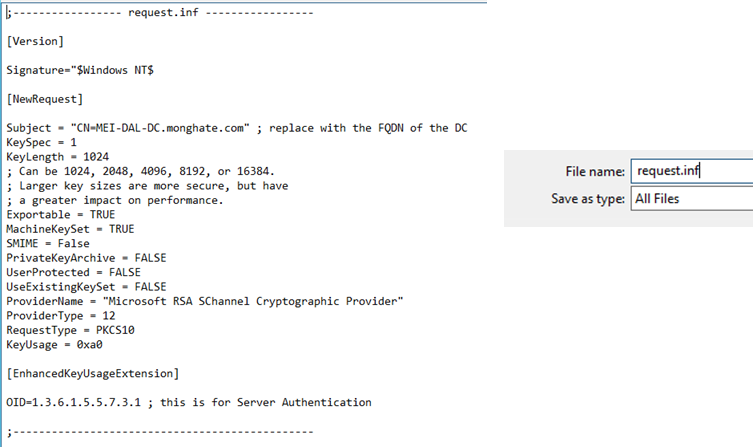
- From the Domain Controller, create a new notepad document – save it as request.inf be sure that Save as Type is set to All Files
- Create a new request.inf definition with the following contents –
replacing ACTIVE_DIRECTORY_FQDN with the qualified domain name of the Active Directory Server. If this FQDN does not match, LDAPS will not work.
[Version] Signature="$Windows NT$" [NewRequest]
Subject ="CN=ACTIVE_DIRECTORY_FQDN"
KeySpec = 1
KeyLength = 1024 Exportable = TRUE MachineKeySet = TRUE SMIME = FALSE
PrivateKeyArchive = FALSE
UserProtected = FALSE
UseExistingKeySet = FALSE
ProviderName = "Microsoft RSA SChannel Cryptographic Provider"
ProviderType = 12 RequestType = PKCS10 KeyUsage = 0xa0
[EnhancedKeyUsageExtension]
OID = 1.3.6.1.5.5.7.3.1 ; Server Authentication
- Create the Client Certificate Request – Client.csr
- From a command prompt on your server, Change Directory to the location of the request.inf file you created.
- Our example is CD C:\users\domain.admin\Desktop\AD_Cert_LDAPS
- Once there run the following command:
- certreq -new request.inf client.csr
- You should receive the same response as shown in the image below

- On the machine with OpenSSL installed
- Create a new text document named v3ext.txt
- Inside it put the following information
- Save it to our Bin folder. - %programfiles%\OpenSSL-Win64\bin
keyUsage=digitalSignature,keyEncipherment
extendedKeyUsage=serverAuth
subjectKeyIdentifier=hash

- Copy the Client.csr file created on the Domain Controller to the path:
→ %programfiles%\OpenSSL-Win64\bin on the machine with OpenSSL.
From your admin command prompt that is in the directory listed above- run the following command:
-
openssl x509 -req -days 3650 -in client.csr -CA ca.crt -CAkey ca.key -extfile v3ext.txt - set_serial 01 -out client.crt
-
It will ask you for the password you originally set on the file

-
- Verify the contents of the new file with the following command
-
openssl x509 -in client.crt –text
- We want to verify the x509v3 items list properly
-
- Complete the Certificate Request.
- Take the newly created client.crt file and copy it from the bin folder on the openSSL machine over to the Domain Controller, ideally to the same path you already have the command prompt open for
- Type the following command:
-
certreq -accept client.crt

-
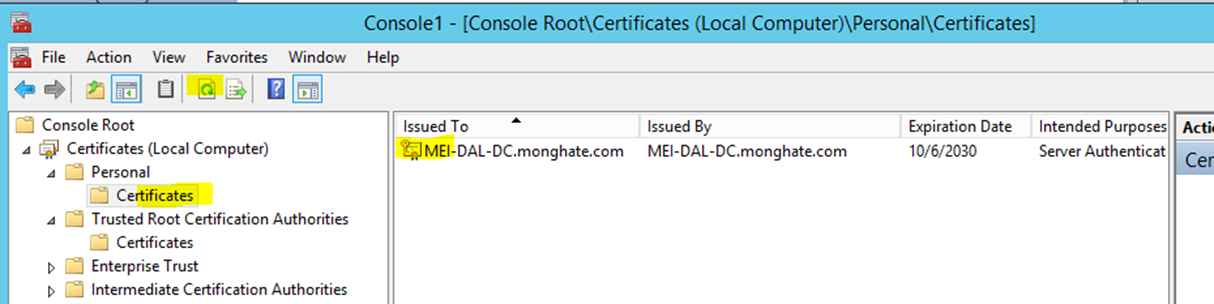
- Check Certificate by opening the Certificates MMC that we were using previously: Find Personal > Certificates and we should see a new one listed. You may need to refresh the page
- Verify connectivity
- Attempt to enable the SSL option for AD import from the IAM site and see if it will communicate now.
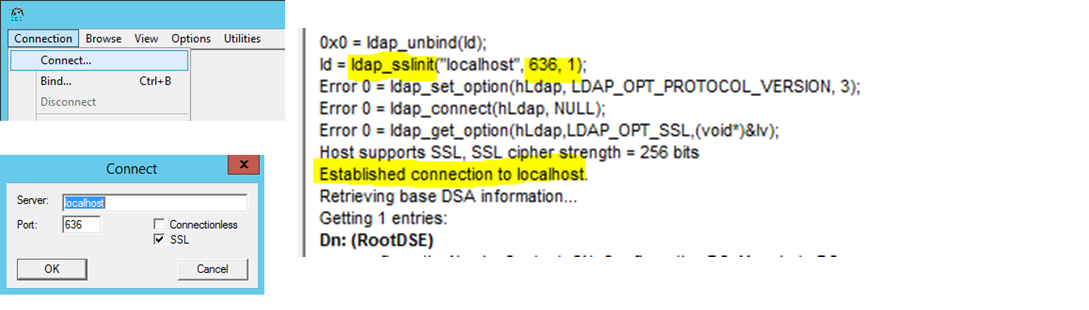
- You can also test this from your server or another server on your network if you open ldp.exe
- If testing from another server change localhost to the servername you imported the certificate to